Venture 17 Upgrades
Below you will see the upgrades to two Venture 17's, one mine and
another owned by Bruce Sheaffer who was kind enough to send pictures
and details along
with permission to post them.
I can be reached at 530-468-2280 (near Yreka, CA by the OR/CA
border) or email at jim@sisqtel.net
Now, to launch into my ever-so-humble, opinionated, but still learning
style.......
Don't tackle the keel on your Venture unless you are willing to take
some safety precautions!!
 A stack of rubber gloves is a must, as the allergic reaction to
epoxy can last for life! Far easier to avoid it - especially the
hardener should not be allowed to contact your skin..
A stack of rubber gloves is a must, as the allergic reaction to
epoxy can last for life! Far easier to avoid it - especially the
hardener should not be allowed to contact your skin..
Access to the keel requires some form of elevating the boat. I used a
beam in my barn and a come-along and a chain hoist.

There were basically four things that my Venture needed:
1) New trailer beds, as the old 2 x 4's had taken a set and were
dimpling the boat.
2) New keel cable bolt. The bolt was badly grooved by the cable. If you
are new to your boat, may I strongly suggest that you check this.
3) Keel was cracked from the improper trailer setup, and was very rough.
4) The port deck beside the cabin had sagged, and there was a space
under the window.
---------------------------------------------------------------
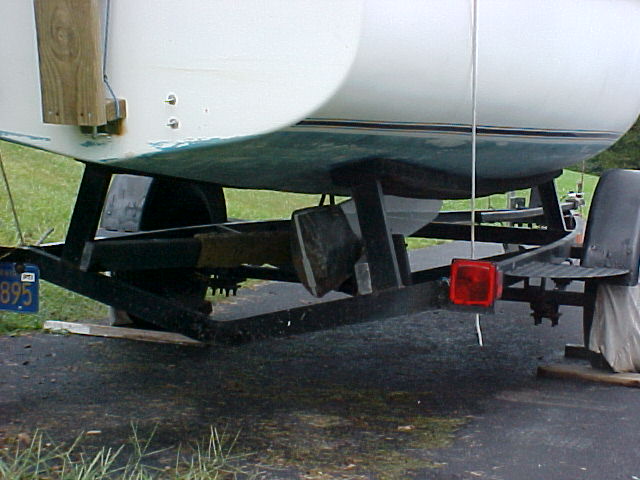
First, the trailer.
Above you can see the new beds - carpeted 2 x 6's that are longer than
the original 2 x 4's.
Below you can see how badly the old beds were bowed. Also visible
in this picture is the

roller on the second from the rear cross member that is DEATH TO SWING KEELS!!!! I have seen this
problem on an earlier Venture 21. It breaks the keel as the 300 pound
weight is concentrated in the end, and it puts too much force on the
roller. I will replace it with a board that is free to swivel so that
the keel sits on it with the board parallel to the keel's leading edge.
--------------------------------------------------------------------------------------------------------------------------------
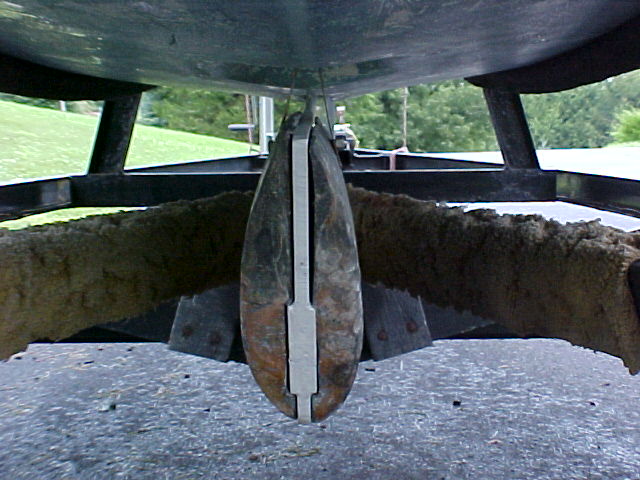
Keel cable bolt
The Venture 17 and 21 keels are raised by a winch on a board that spans
the cockpit footwell. Many of these winches have been replaced by
standard boat trailer winches - termed "knucklebusters" for good
reason. Available from Northern Tools, a winch with a clutch is a
better solution. The cable leaves the winch and goes down through the
footwell drain and BEHIND the bolt in the
drain. Here is what it
looks like from the underside.

See where the cable has worn a groove in the bolt? That can lead
to big problems, as it will start to pinch the cable. The fix (in
my
opinion) is to replace the bolt from time to time OR replace it once
and
switch to one of the new low stretch lines. By the way, if you ever
lose
the cable and need to get on the trailer with your Venture, just "drive
over"
a rope with the boat, and then use the loop to pull the keel up from
the
cockpit. No fun, but it will get you on the trailer. If you have line
winches,
use 'em. Back to the bolt - if your boat is stock, you may have access
to
this. Count your blessings. On older boats, some DPO (that is the
demented
or dear previous owner - your call) mods are common, and you may find
the
bolt totally encased in a mount of epoxy. Both my Ventures came this
way.

I went after it with a Dremel which gave up the ghost with arcing
brushes, so I finished with the Makita grinder. Here is what you
are looking for - either a stainless steel bolt or a rod may be
substituted by the DPO.

Grind until you see sparks..... and remove the bolt and replace it with
a stainless steel bolt. (This is a full protection suit and respirator
job.) Some skippers have added a short piece of pipe or other roller to
preserve the bolt. My solution is to switch to a low stretch line such
as Stayset X
(I actually went even MORE first cabin here - it only takes 10 of 12
feet.)
Reinstall the bolt, and refiberglass the bolt in place. If your boat
has access to the bolt, so much the better.

Here is the new bolt in place. Epoxy and fiberglass it in place/
---------------------------------------------------------------------------------------------------------------------------------
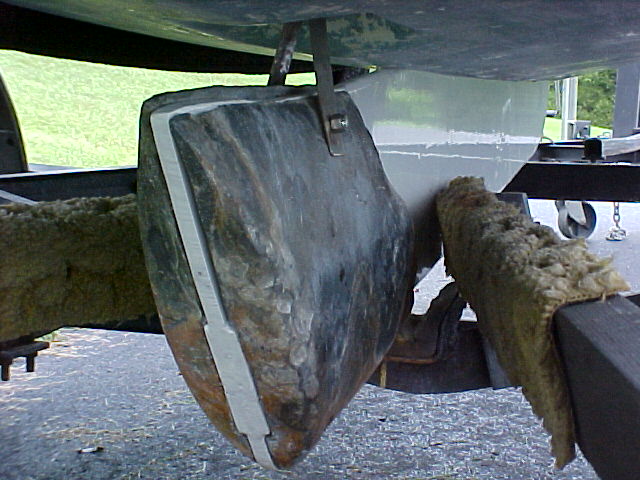
Now to the keel. It weighs 300 pounds, and the total V17 is about 800
pounds. Hoist it carefully. I like to use nylon tow straps and I trust
the
ridge beam of my barn, but then I pray a lot. Don't get hurt.
The basic process is to grind into any cracks, and use epoxy putty and
glass to strengthen the keel. Then, fair the keel using epoxy and
microballoons or silica or wood powder. This means take a plastic
spatula type spreader and "frost the cake" with it. The photos are hard
to read, but here is the keel before I started.

I have ground into the cracks caused by the trailer roller, The surface
texture is very rough. Wear that respirator when you sand fiberglass!
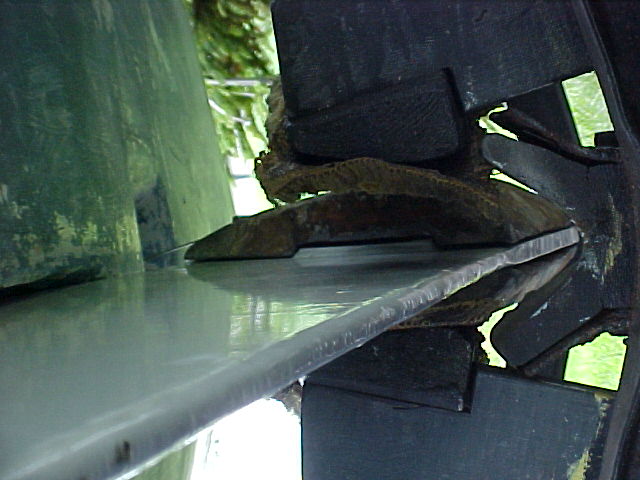
The next picture shows the keel looking rougher than it is, but it has
had several layers of fiberglass in epoxy over the cracks which were
first filled with thickened epoxy (and glass where possible)

Sand and fair the keel until you are fed up with it. After the epoxy
cures, you may use a primer and then paint it. I will post some picture
of the next stages later - maybe. Update: well here it is, "perfect
enough" as they
say. One could keep on fairing and sanding until it is like, new,
but this was a big improvement, and I can settle for a "workboat
finish", as you
can't see it from my house anyway.

------------------------------------------------------------------------------------------------------------------------------
Here is the window fix in process. This, too, might see an update.

The clamps hold a board that was covered with Saran Wrap, and here four
layers of glass have started to make the cabin wall where it radiuses
from the deck. The deck was not that saggy, jut just to be sure it was
firmed
up by epoxying a piece of 3/4" plywood under it. Here is the window
bottom
radius after 6 layers of fiberglass:


and on the right, needing only some blending in and final paint.
The window caulking on the aluminum window trim needed replacing,
and I am trying a local hardware store product shown installed below:

The last project involved a new keel support, and I copied one that I
made for my Venture 21. This board mounts on the old roller mount, and
can pivot to match the exact line of the front of the keel. This
distributes the weight of the keel, and prevents cracks where it rode
on the old roller. (By the way, in my opinion, the boat should be
trailered with the cable slack and the weight on the trailer, not the
winch. The paint is drying on that now, but here is the V21 setup:

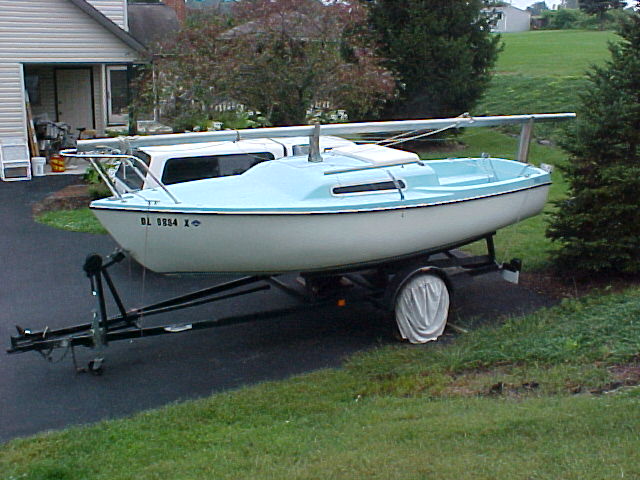
Well there you have it - I am ready to hit the water as soon as the
paint dries. Feel free to email me any questions. Please steal this web
page and put it somewhere if you think folks will use it. No rights
reserved. All
ideas offered without guarantee. If you use these ideas and sue me, you
will
have nightmares and mosquitoes in your bilge water. Otherwise, happy
sailing
- keep those old gals afloat!
Update: I sailed the boat several times, and I am very pleased with the
line that replaced the steel cable to raise the keel. I am also pleased
with
the Tiller Tamer as a great add-on for single handing skippers. It
allows
you to set the tension so you can just give it an occasional bump, or
go
forward to grab a soda or tend the jib. It really reduces the fatugue
from
a day sailing. (Available West Marine , about $25.)
------------------------------------------------Project #2 Bruce's
Boat-------------------------------------------------
Here is the email that Bruce sent followed by his pictures. This could
be particularly helpful if your keel is badly damaged or missing, as he
"made a new one" from scratch, and in my opinion, did a heck of a job
that yielded super results. Here's Bruce:
I too have just repaired my
keel. I took a simpler approach.
After my local sailboat dealer told me to throw away the sailboat as it
is beyond economical repair. I was
determined to show him that he was wrong. Living in the Amish Country of
Lancaster Co. Pa. I went to
an Amish man who makes horse drawn plows. I had him cut the shape of the
keel out of 1/2" steel plate.
Large steel washers, made of steel plate, were welded to the keel where
the pivot bolt goes through. This
was to duplicate the thickness of the original keel at this location.
Holes were drilled to reattach the lead
weights and the connection point for the winch line. I sent the keel to
the next Amish man who does powder
coating and had it zinced and powder coated white. I reattached the lead
and with the help of three
friends and a car floor jack we were able to install the keel while the
boat was resting on the trailer. The keel
is a few pounds heavier than the old one but I don't have to mess with
fiberglass. I have test sailed the
boat, however, the wind was too light to see if my modification of the
keel will effect the handling. I may
have to remove some of the lead weight. It does seem to sit ok in the
water and motors just fine with the
3hp Johnson. Now for the cost of the new rudder $185.00. That sure shows
that McGreger dealer that
we V17 owners are resourceful.  Happy Sailing,Bruce Sheaffer


Thanks for sharing Bruce!
Hey, that's all, folks. If you would like to steal these, please do. In fact, I welcome you putting them into a real web page done by someone who plans to keep it accessible to newbie Venture skippers. God Bless! Jim